This step is critical into making the frame and logo/signature placement truly automated for Batch Processing.
It's extremely simple. For the setup, I'm not even going to take screenshots.
- In the same set as before, we're going to create an Action called "_frame". I like to use the underscore to make primary Actions that execute other ones stand out.
- As we press Ok, it's going to go in Record mode.
- Open ANY image (it really doesn't matter), creating an "Open" step.
- In the Actions palette, that you should still have open, click on the "AddFrame" action and press the Play button to add a Frame.
- Repeat the above for the "AddSignature" action.
- As I tested this on other people, I noticed that it wasn't necessarily clear why this following step was done. Go to Layer > Flatten Image.
The reason is simple. These types of frames are usually used as a signature style on Online Galleries or other online use. We'll most likely be working from and to JPEGs. This Flatten step assures that the automated saving action saves into JPEG instead of the Default PSD. On some versions of Photoshop, depending on the way settings are setup in the Preferences menu, even with an automated saving Action it sometimes saves into PSD. - Lastly, save the image in another (temporary) folder.

In order to actually execute the _frame Action in a Batch automation, you need to do the following.
- I like to put all the photos to be "framed", after being tweaked a bit, into a specific folder. You can call that folder "Selection". While there, create another folder with a name like "Post Selection" or "Upload", "Destination", or something like that.
- Inside of Photoshop, go into File > Automate > Batch.
- Do make sure you:
- Select the right Action Set and the _frame Action.
- Set both Source and Destination to Folder and select the Source folder (where you dropped your selection of photos) and your Destination folder.
- Check both Open and Save overrides and the Suppress Color Profile warnings
- If you feel like it, it's the perfect place to Batch Rename your selection.
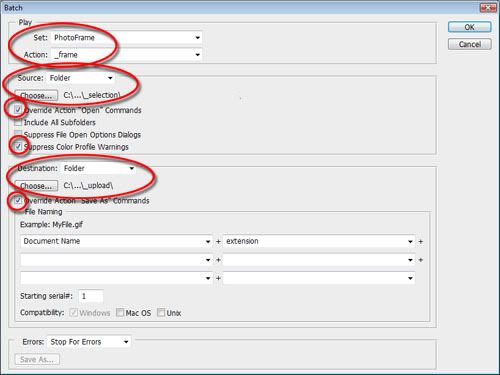
- Press Ok.