The basics of the method is borrowed from an old Layers Magazine tutorial. I'm just going to cover the bare bones of the technique. You will probably adjust the parameters for your own needs.
This post is only going to cover the actual frame. Following posts are going to cover the signature and then how to put it all together and why.
The method is incredibly original in its application. It is not this way to be original, but to be adaptable for various series of Actions and accessible on various versions of Photoshop.
The size of the frame will depend on the image size and what you want. For the sake of the example, I'm going to use a 600 pixels wide image by 800 pixels high.
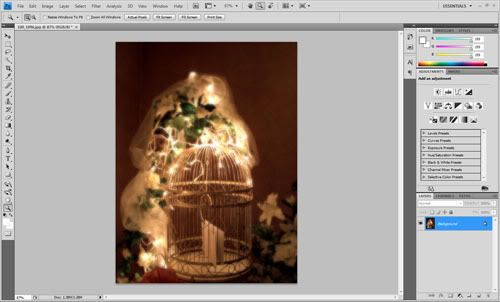
- Of course, the very first step is to open an image.

- Since we're going to be creating a set of Actions, might as well have the Actions Palette show, right? Do it in any way you like. If you don't know where it is, just go to Window > Actions or press [Alt] + [F9].
- I always like to be organised. We're going to be creating a new set of Actions by clicking on the Create new set button and naming that set "PhotoFrame".

- This Set is going to contain three actions. But, we're going to start with just one. Where going to click on the button next to the right of Create new set, Create new action and name it "AddFrame", because that's exactly what it's going to do.
As soon as you press Ok, you'll notice the Record button at the bottom of the Action palette is already pressed, ready to record the very first action. Everything can followed will leaving "Record" on. I will cover how to tweak/re-record steps after. - The very first step is to create duplicate the "background" layer. The simplest way to accomplish this is to press [Ctrl] + [J]
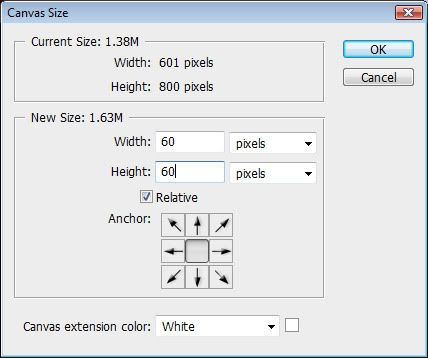
- Go to Image > Canvas Size and do the following:

- Check the "Relative" box
- Set the width and height to 60 pixels from the center
- Set the Canvas extension color to White
You should now have a white border around the whole picture.
- Now we will re-do the same step as above except that we're now going to extend 40 pixels from the top, which is going to be added at the bottom of the photo.
- The first recorded step was to duplicate the background layer, and this is why.
[Ctrl] + Left Click on the duplicated layer, which is essentially the photo without the border.
Go to Selection > Transform Selection and stretch the selection a bit bigger than the image, but less than halfway through the frame, with one of the transformation handles and holding down [Shift] + [Alt]. Confirm by pressing Enter - Go to Edit > Stroke and set it up to a 3 pixel black stroke.
- Press the Stop button in the Action Palette
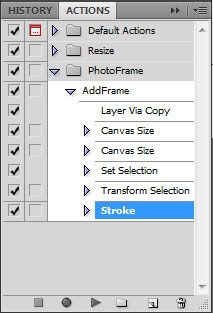
Your Action Palette should look like this (minus the "Resize" Action Set)

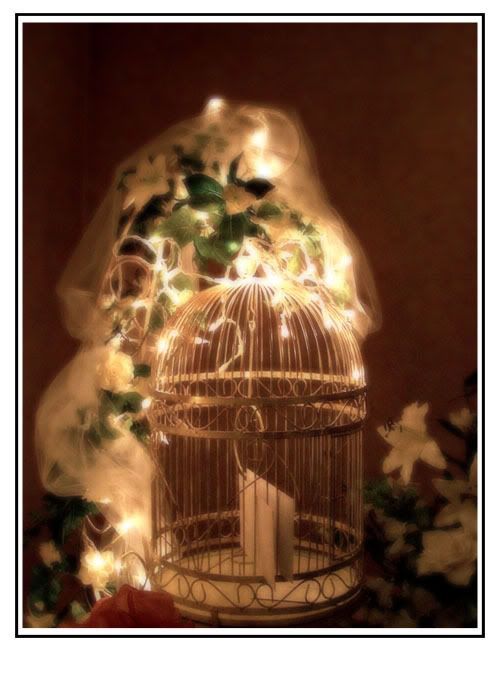
The result should be a frame that looks like this around your picture.

To apply the same frame to another picture, you just need to open another file, select the AddFrame action and press the Play button.
If you are not happy with the results of one of the steps, here's how. For the sake of the example, we'll pretend I think the first "Canvas Size" extension is too big.
- The first step is to delete the step that you're not happy with, in this case the first Canvas Size.
In some cases, you may need to "play" some steps to have some very specific conditions such as the way we added the stroke. - Press the Record button in the Action palette.
- Just re-do the Canvas Size step the same way we originally did, but put 30 pixels instead of the original 60 pixels.
- Press the "Stop" button.
- To test, you can load in a new image and press the "Play" button to execute the AddFrame action.
The next post will cover the placement and positioning of a signature/logo.
EDIT: I highly recommend that you add an "Deselect" action at the end of the AddFrame
action.


