This time, I'm going to cover the exact method on how to create the Actions that's going to insert a Logo or Signature and position it at the bottom-right corner of a photo.
Those following my Blog know that I had problem figuring out how to do exact positioning in Actions when bottom and right were involved. To be honest, at one point I didn't think it was even possible until I read this comment on someone else's Blog who had the same question. Thanks to Cemal Ekin, I was able to make my signature Action that way I wanted. Today, I'm sharing it with you.
It's incredibly simple, especially if you followed along with the previous post on how to make the frame. It's a similar method.
There is a pre-requirement before I post the steps. You need to have a logo or signature in a PSD, EPS, or any "importable" (File > Place) file format with transparency. Make sure it's one layer (in a PSD) or one group (in EPS).

For the sake of the example, I have a logo in EPS format. This is what I'm going to import on the image.
I'll leave from the result of the last post.
- In the PhotoFrame Action Set, we're going to create a new Action by clicking on the Create new action button and call it "AddSignature".

- As previous, the "Record" button is already going to be pressed. Go to File > Place and get the file of your logo or signature. Resize it if needed, but do not move it. Once done, press [Enter].
- The added logo has its own layer, and it's selected by default unless you clicked something else (which you shouldn't have...). While the logo/signature layer is selected by default, [Ctrl] + Left Click on the background layer. This is critically important.

Now select the Move tool and look at the top of the screen for the Align buttons. Click on the Align Bottom and Align Right buttons. It should now look like something like this: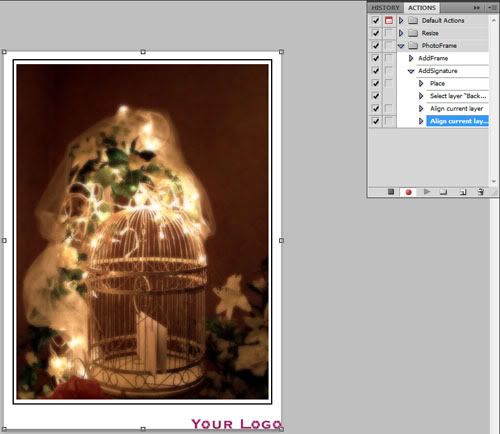
- Now deselect the Background layer by clicking once (with the Move tool still selected) on the layer with the signature/logo. Start nudging it into place using the Arrow keys.
- If, like me, your Logo is a (or many) color that doesn't fit in the frame, while still recording, add a Black (or whatever color contrasts well against the background, the same as the stroke around the photo in the frame should do) Color overlay by adding a Layer Style to the signature/logo
- Press the Stop button.
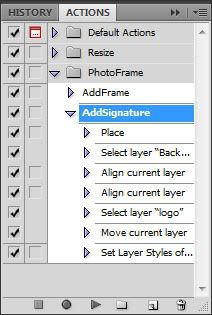
That is all. Your Actions should look something like this...
Next post is going to cover how to set these two Actions up for Batch Automation. One Batch process can do both and more.